
AI image generators can create impressive results, but the quality of the final image depends heavily on the instructions you provide. A short prompt may produce something interesting, but a carefully organized prompt gives you much more control over the subject, composition, lighting, style, and overall mood.
The goal is not simply to make your prompt longer. The goal is to give the AI useful visual directions that work together.
1. Start with your basic idea
Begin with a simple description of the image you want to create.
For example: A little boy sitting beside a bucket filled with frogs.
This gives the AI a subject and an action, but it leaves many creative decisions unanswered. The generator must decide what the boy looks like, where he is sitting, how the camera is positioned, what kind of lighting is present, and whether the image should look realistic, illustrated, cinematic, or cartoon-like.
That uncertainty is one of the main reasons basic prompts can produce unpredictable results.
2. Use an AI assistant to improve your prompt
Before generating the image, run your original idea through an AI assistant. Ask it to organize and expand the prompt based on the result you want.
You might ask: Improve this image-generation prompt. Add details about the subject, pose, environment, lighting, camera angle, composition, photography style, and aspect ratio.
Review the revised prompt before using it. Make sure the AI assistant has not added details that change your original idea.
An improved version might read: A cheerful eight-year-old boy sitting on a weathered wooden dock beside a small metal bucket filled with colorful frogs. He is leaning forward with one hand resting on the bucket and looking curiously at a frog sitting on its rim. The scene takes place beside a quiet country pond during the early morning. Soft golden sunlight passes through the trees, creating gentle highlights and natural reflections on the water. Photographed from the boy’s eye level with a 50mm lens, shallow depth of field, realistic lifestyle photography, warm natural colors, landscape composition, 16:9 aspect ratio.
The expanded prompt gives the generator much clearer creative direction.
3. Describe the subject precisely
Explain who or what should appear in the image. Include the visual details that matter, such as:
- Age range
- Clothing
- Hair
- Facial expression
- Body position
- Direction of attention
- Objects being held or used
- Relationship to other subjects
When a person appears in the image, describe the pose as if you were directing them during a photo shoot.
Instead of writing: A woman in a field.
Try: A woman standing in a wildflower field, facing slightly away from the camera, looking back over her right shoulder with a relaxed expression. Her left hand gently holds the edge of her flowing dress while a light breeze moves her hair.
Clear posing instructions can improve body position, storytelling, and composition.
4. Direct the camera
Camera terminology helps the generator understand how you want the scene presented. You do not need to be a professional photographer, but a few useful terms can make a major difference.
Camera angle
- Eye level: Natural and neutral
- Low angle: Makes the subject appear powerful or dramatic
- High angle: Looks down on the subject
- Overhead view: Camera points directly downward
- Close-up: Emphasizes a face or small detail
- Wide shot: Shows the subject and surrounding environment
- Over-the-shoulder: Places the viewer behind another subject
Lens and focus
- Wide-angle lens: Captures more of the environment
- 50mm lens: Produces a natural-looking perspective
- 85mm portrait lens: Creates flattering portraits and background separation
- Macro lens: Captures extremely small details
- Shallow depth of field: Keeps the subject sharp while softening the background
- Deep focus: Keeps most of the scene clear and detailed
You can also describe the camera’s distance from the subject and where the subject should appear inside the frame.
5. Define the lighting
Lighting controls the mood and helps establish the time, location, and emotional quality of an image.
Useful lighting descriptions include:
- Soft natural window light
- Bright commercial studio lighting
- Warm golden-hour sunlight
- Dramatic side lighting
- Soft overcast daylight
- Neon city lighting
- Candlelight
- Cinematic rim lighting
- High-key lighting
- Moody low-key lighting
Instead of simply writing “dramatic,” explain what creates the drama: Strong side lighting with deep shadows, a warm orange rim light, and a cool blue background.
Specific lighting directions are easier for the generator to interpret than general emotional words.
6. Choose a visual style
Tell the generator what kind of image you want. The same subject can look completely different depending on the selected style.
Possible styles include:
- Realistic photography
- Commercial product photography
- Editorial photography
- Cinematic film still
- Watercolor illustration
- Colored-pencil drawing
- Retro advertising illustration
- Three-dimensional animation
- Graphic novel artwork
- Minimalist vector art
- Vintage travel poster
- Children’s storybook illustration
You can also describe the desired color palette, texture, level of realism, and time period.
For example:
A late-1990s Mexican fiesta restaurant advertisement with vibrant red, turquoise, yellow, and orange colors, playful hand-painted textures, and cheerful commercial illustration.
7. Include the aspect ratio and orientation
The aspect ratio determines the shape of the image. The first number represents the horizontal dimension, and the second represents the vertical dimension.
| Ratio | Orientation | Common use |
|---|---|---|
| 16:9 | Landscape | Website banners, video and presentations |
| 9:16 | Portrait | Stories, Reels and mobile displays |
| 4:5 | Portrait | Social media posts |
| 3:2 | Landscape | Traditional photography |
| 1:1 | Square | Product images and social posts |
If the layout is important, include both the ratio and the orientation: Landscape composition, 16:9 aspect ratio.
You can also explain where the subject should appear: Place the subject on the right side of the frame, leaving clean open space on the left for a headline.
This is especially helpful when creating website hero images, advertisements, posters, and social media graphics.
8. Describe what you want using positive instructions
Many image generators respond more consistently to positive descriptions than to long lists of things to exclude.
Instead of writing: No background.
Try: Isolated against a clean, solid white background.
Instead of: No people and no cars.
Try: An empty downtown street in the early morning.
Instead of: Do not add text.
Try: A clean visual composition with open space reserved for text to be added later.
Some generators support negative prompts, and those controls can still be useful. However, the main prompt should clearly describe the desired result.
9. Use reference images strategically
A reference image can help communicate composition, pose, lighting, color, or atmosphere.
Upload the reference to an AI assistant and ask: Describe this image in enough visual detail to recreate its composition, camera angle, lighting, subject placement, color palette, and overall style. Then turn the description into an image-generation prompt.
After receiving the prompt, replace the original subject and details with your own.
For example, a reference showing a little girl with a bucket of flowers might become: A little boy sitting in the same general position beside a bucket filled with frogs.
The purpose is to use the reference as creative guidance while producing a new image with your own subject and details.
Avoid requesting an exact copy of a protected character, logo, artwork, or living artist’s distinctive style. Describe the broader visual qualities you like, such as the colors, lighting, medium, composition, or historical period.
10. Change one major detail at a time
If the first result is close but not correct, avoid rewriting the entire prompt immediately. Change one or two details at a time so you can identify what improves the image.
A practical refinement process is:
- Correct the composition.
- Adjust the subject and pose.
- Refine the lighting.
- Improve the colors and style.
- Correct small details.
- Generate the final high-resolution version.
This approach gives you more control and makes successful results easier to reproduce.
A practical prompt formula
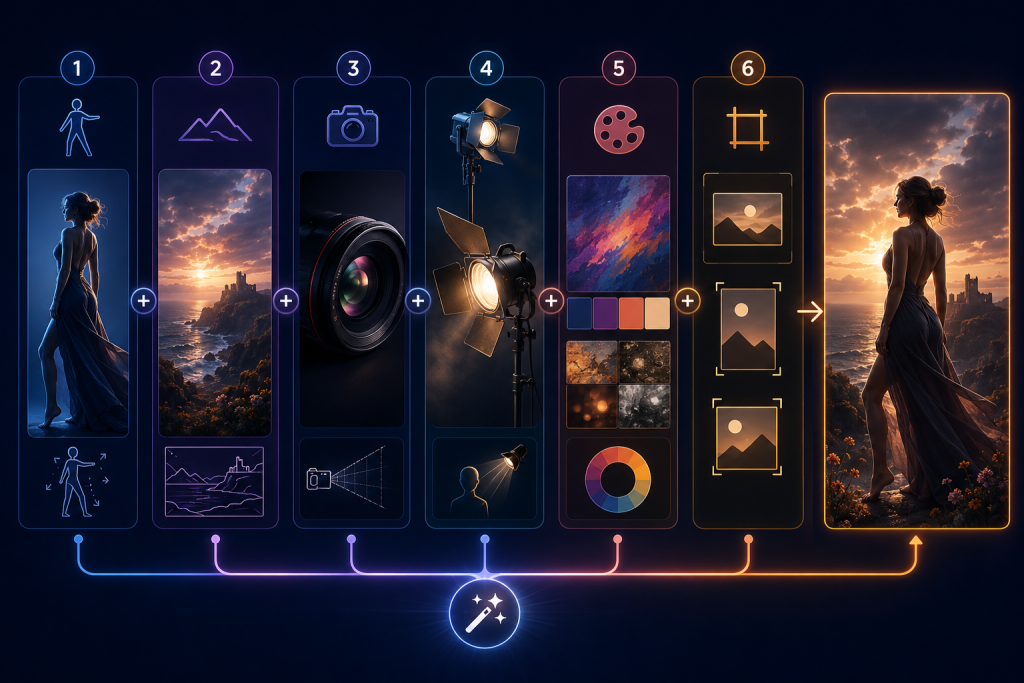
Use this structure as a starting point: Subject and action + pose and appearance + setting + camera angle and lens + lighting + visual style + color palette + composition + aspect ratio
Example: A confident female chef arranging colorful tacos on a rustic wooden counter, standing at a three-quarter angle and looking down at the food with a friendly smile. The setting is a lively late-1990s Mexican restaurant decorated for a fiesta. Photographed slightly below eye level with a 50mm lens and shallow depth of field. Warm restaurant lighting with colorful decorative highlights. Cheerful commercial food photography with subtle retro styling, vivid turquoise, red, yellow, and orange colors. Place the chef and food on the right side of the frame with clean space on the left for advertising copy. Landscape composition, 16:9 aspect ratio.